Showing posts with label easy cards. Show all posts

Monday, April 4, 2022

Floral Frame 5x7 Card

Hi friends! For todays card I am creating my very 1st 5x7 card. 
I'm using Scrappy Tails Crafts A7 Flower Cover plate die.
To start off I die cut the flower border from 110lb Neenah cardstock from Cutcardstock. 
The next step was to die cut the shadow layer. 
So I used the outer layer die and the inner die for that.
Then I colored my flowers and glued it to my shadow layer and then die cut THANK YOU FRIEND" 3x and stacked them up. I die cut the word shadows from 48lb Vellum from Cutcardstock as well.
Once that was done I glued it down to rough textured cardstock. 
I die cut 2 vellum leaves and stuck them under "for your kindness"
I added my panel to a black cardbase (130lb Epic Black cardstock) and some black splatter to the rough panel.
 The last step was adding iridescent gems to the flowers, shimmer and white gel pen to them as well. 
Thanks so much for stopping by.
Some of the links are affiliate  links & if you use them I'll receive a small commission at no extra cost to you at all.
Thanks for stopping by!๐ŸŒธ๐Ÿ’—

Tuesday, January 25, 2022

Day 2 The Rabbit Hole New Release Hop

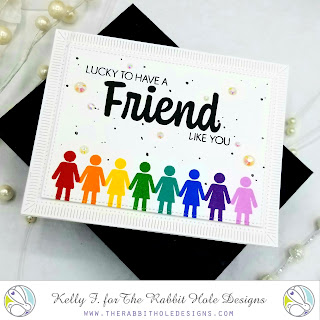
 Hello Rabbit Hole Friends! Its Day 2 of the New Release hop & I'm definitely feeling a rainbow vibe. For todays cards I'm using simply the Friend stamp for both

To start off I used The image of the woman and positioned it in the MISTI so I could just shift my cardstock and repeat stamping easily. I used Catherine Pooler inks for every color. Rockin Red, Orange Peel, Tiara, Grass Skirt, Aquatini, Suede Shoes, Royal Treatment & Pixie Dust. I then stamped my "Friend" & sentiment in Versafine Onyx ink. Then I used a Black Glaze Gelly Roll pen for my black splatter which I applied manually. Lastly I added some iridescent gems for some sparkle. 

I added foam tape to my panel and mounted in to my 110lb Neenah card base from Cutcardstock. For my 2nd identical card I used the man image and did the same thing but I used a black mat under my panel and I added some Pops of Color in Clear & Snowflake.


I hope you like these cards & you check out the new release! The next hop is  Deana-

To celebrate the February 2022 release, The Rabbit Hole Designs is giving away two savings vouchers; one to a lucky Instagram follower and one to a lucky Fan Page follower. Winner will be chosen at random from the comments left on the INSTAGRAM post, and tagging friends, and also from commenting on the Fan Page post. So make sure to head on over to INSTAGRAM and look for the giveaway post @therabbitholedesignsllc and look for the post at The Rabbit Hole Designs Fan Page
by 11:59 p.m. PST 01-27-2022
Winners will be contacted via DM for the IG winner and announced in the Facebook Fanpage group on 01-28-2022

The above links are affiliate links. If you use any I will receive a small commission at NO extra cost to you. And Id be super grateful. Stay Crafty My friends!

Sunday, January 9, 2022

Clarence & Clarice Love Each Other! The Rabbit Hole Birthday Hop

Hi Friends! For my 2nd card for The Rabbit Holes Birthday Hop I'm using the Clarence & Clarice stamp. 
To start off I stamped my image with Memento black ink onto 80lb Neenah Cardstock from Cutcardstock. 
I used my copics to color them and I drew a line on the ground with a Memento Marker. I then ripped the edges and added a bit of black from a blending foam pad (whatever was on it already). 
Then I grabbed a piece of heavyweight Vellum (48lb) also from Cutcardstock and I ripped that too.
I die cut the word "Love" from The Rabbit Hole and stacked it 3x. Colored with copics to match and added Star Dust stickles & then Glossy accents on top. Those 2 together look AMAZINGLY COOL!
I then took a 100lb Desert Storm Neenah card base (also from Cutcardstock) and I used The Rabbit hole Garden Trellis stencil and White pigment ink for the background and heat set it. 
Then I glued the vellum down (not the outer edges) and then added foam tape to my image panel. I adhered it all down and added "My Sweet" and "Love" to it. 
I added glossy accents to the heart, their eyes, ears, teeth & tongues. A bit if stickles to the skirt & bow. A few iridescent gems and thats it. 
I hope you like it. Next in the hop is Deana- www.designcreativebling.com 
 To celebrate the Birthday release, The Rabbit Hole Designs is giving away two savings vouchers; one to a lucky Instagram follower and one to a lucky Fan Page follower.  Winner will be chosen at random from the comments left on the INSTAGRAM post, and tagging friends, and also from commenting on the Fan Page post.  So make sure to head on over to INSTAGRAM and look for the giveaway post @therabbitholedesignsllc and look for the post at The Rabbit Hole Designs Fan Page by 11:59 p.m. PST 01-12-2022  Winner will be announced on The Rabbit Hole Designs blog 01-14-2022

The above links are affiliate links. I receive a small commission at NO extra cost to you if you use any. And Id be so grateful :) Stay safe, stay healthy & stay CRAFTY!

Friday, October 29, 2021

Freestyle panel/Floral Bday card

Hi guys! Kelly here. For this card Im using Altenews "Beauty Within" Stamp & Die set. I have the coordinating stencil but I didn't use it or need it for this card. 
To start off I stamped my Images onto 80lb Neenah cardstock from Cutcardstock. I used Copics to "flick" color onto them. I used:
RV10,RV21,RV23 & RV25
V20,BV20,BV01,BV02 & BV13
BG10,BG23,BG45, & BG13
YG11,YG03,YG25 & YG17
the centers I used YR24 & YR27
Then I die cut everything out. 
Once I laid out how I wanted them to appear I used Press n Seal and press it onto my layout, flipped it over and added glue and foam tape so its 1 large arrangement. 
Now comes the FREESTYLE....I took another 80lb panel of Neenah and I used the CHISEL side of my black Copic and from the outside edge I swiped in like a brushstroke. I repeated that down the left side of my panel. 
I grabbed 3 copics from the flower colors and added dots to the panel. 
I then die cut this above panel with a rectangle embossed edge die from Kat Scrappiness. 
Then I glued it to my 110lb Neenah cardbase from Cutcardstock. I removed the liner from the foam tape and adhered it to my panel on my cardbase. I added a bit of shimmer pen and black glaze pen to the dotted centers.
Then I added my label sticker Sentiment. Done.
I was  going to add some gems but decided this card had enough going on. Thanks so much for stopping by!❤

Friday, October 22, 2021

Simple Coloring

Kelly Fusco here.... thesunshinecrafter here & thanks for stopping by.
I enjoy and appreciate color but I struggle with coloring, like many people. 
So for this card Im using the "flick" method. 
To start I stamped my image with Memento Tuxedo Black onto 110lb Neenah. I used copics:
BG11,BG32,BG34 & BG15 BV01,BV02 
RV21,RV23,RV25 
& a wee bit of YG13 for the leaves. 
Here you can see the flick coloring and for the stamen which got drowned out from the markers I added White Gelly Roll pen. When you color using flicks you leave some white space and you don't have to be perfect or worry about blending. Whoo hoo. Thats for me!
After I finished my coloring I used Versafine Onyx (pigment ink) for my sentiment and I added Hero Arts Clear Embossing powder on top, heated n melted it. 
I die cut my panel with the smaller deckle frame die and I used the full size for my black panel. Then I decided it was kind of plain. So I added white ink splatter. It cracked some when I die cut it but I like the look it gave to it. I also used a Black Glaze pen for some specific splatter.  
I mounted my main panel up on foam tape and I added a few clear Nuvo drops (Morning Dew). At the very end I added a bit of shimmer pen(Wink Of Stella)to the flower petals (hard to see in pics but in person its shimmery)
 Thats it. So easy!
I hope you like this card. I love these colors together and Im a sucker for a floral stamp. Thanks so much for stopping by & check out the shop for all these goodies and much more!
Hugs,
Kelly Thesunshinecrafter

The above links are not affiliate links but rather links to the BRI store. I am not an affiliate with BRI just a fan. 

Friday, February 26, 2021

Easy Slimline Card

I love making Slimline cards and they are so popular now. 
So for this one I used Hero Arts Monarch Butterfly which gives incredible realistic results. 
I started off stamping the bottom layer in the light color, next layer in a darker shade (same color family) and the final outline in black. It would be great embossed too! I used Catherine Pooler & Hero Art Inks.
I die cut each butterfly, I lined them up how I wanted them to be and I used Glad Press n Seal to pick them up as a whole. I then added foam tape.
I die cut my panel from Trinity Stamps Quilted Cover die and added the polka dots from the Quilted trio coordinating stencil set in gray ink. 
My card base is 110lb Neenah from Cutcardstock  and measures 3.5" x 8.5".  I added a black mat slightly smaller. And my Quilted panel a bit smaller than that.
I adhered the butterflies to my panel and added some shimmer pen for some sparkle. I added Trinity Stamps unicorn tears gems for some more sparklie goodness (love those gems...drooling)
My sentiment was heat embossed using Versafine onyx with Clear embossing powder from WOW!
if you would like to see the video and more details heres the link:

https://youtu.be/Z5QlPSynGkc

Thank you so much for stopping by! Stay safe, stay healthy  & stay CRAFTY๐Ÿ–Œ๐ŸŽจ๐Ÿ–✂️๐ŸŒž๐Ÿค—
***the above links are affiliate links. If you use any I will receive a small commission at NO extra cost to you whatsoever. Id be so grateful for any support! Big hugs! ๐Ÿค—Remember, Kindness is always beautiful!๐ŸŒˆ⭐๐Ÿฆ‹

Tuesday, December 15, 2020

FAST WASHI tape Cards

Lets face it, some recipients will receive their card, read it and toss it. Therefore a quick, easy card is needed. 
I used some festive washi tapes here.
I added my tape to 80lb Neenah cardstock from cutcardstock. Then die cut it from Michaels Recollections tree set. Then I used a DecoColor gold pen for the edges of my trees and for my ink blended background which I used Whimsy Stamps Brick background stencil. 
I chose Fog reactive ink because it matched the green on the washi tape. I added foam tape to the back of my trees for dimension. The sentiment strips are from SSS. I used the gold paint pen on that too, carefully not to smudge it. 
I repeated the above with a different washi tape. And thats it. 
I hope you like this minimal supplies quick washi tape cards.๐ŸŒฒ
Happy Holidays! stay safe๐Ÿ˜ท๐ŸŒฒ❄